Versa branch appliance can be staged using following three ways.
- Staging script
- URL based ZTP
- GZTP
When the device template and the device-workflow is created on the Versa Director with required parameter configured correctly, the appliance is ready to be onboarded.
Please see the procedure and the troubleshooting commands for the staging issues in each of the type.
Staging script
- Login to the Versa appliance with default credentials, through console or management port
- Run the staging.py script with sudo access and -h option to look for help options and default parameters
[admin@Branchx2xHAx1: scripts] $ sudo /opt/versa/scripts/staging.py -h
[sudo] password for admin:
usage: staging.py [-h] [-l LOCAL_ID] [-r REMOTE_ID] [-n SERIAL_NUMBER]
[-c CONTROLLER] [-c6 CONTROLLER6] [-t {staging,prestaging}]
[-w {0,1,2,3,4,5,6,7,8,9,10,11,12,13,14,15,16,17,18,19,20,21,22,23,24,25,26,27,28,29,30,31,32,33,34,35,36,37,38,39,40,41,42,43,44,45,46,47,48,49,50,51,52,53,54,55,56,57,58,59,60,61,62,63,64,65,66,67,68,69,70,71,72,73,74,75,76,77,78,79,80,81,82,83,84,85,86,87,88,89,90,91,92,93,94,95,96,97,98,99,100,101,102,103}]
[-v VLAN] [-s STATIC] [-s6 STATIC6] [-g GATEWAY]
[-g6 GATEWAY6] [-d] [-d6] [-a] [-gt GLOBAL_TENANT_ID]
[-lk LOCAL_PSK] [-rk REMOTE_PSK] [-p] [-pu PPPOE_USER]
[-pp PPPOE_PASSWORD] [-ps PPPOE_SERVICE]
[-pa PPPOE_ACCESS_CONCENTRATOR] [-wu WWAN_USER]
[-wp WWAN_PASSWORD] [-wapn WWAN_APN] [-wpin WWAN_PIN]
Setup branch staging config
optional arguments:
-h, --help show this help message and exit
-l LOCAL_ID, --local-id LOCAL_ID
Local id-string/email
-r REMOTE_ID, --remote-id REMOTE_ID
Remote id-string/email
-n SERIAL_NUMBER, --serial-number SERIAL_NUMBER
Serial number
-c CONTROLLER, --controller CONTROLLER
Controller IPv4 address/FQDN
-c6 CONTROLLER6, --controller6 CONTROLLER6
Controller IPv6 address/FQDN
-t {staging,prestaging}, --staging {staging,prestaging}
Staging type (default=staging)
-w {0,1,2,3,4,5,6,7,8,9,10,11,12,13,14,15,16,17,18,19,20,21,22,23,24,25,26,27,28,29,30,31,32,33,34,35,36,37,38,39,40,41,42,43,44,45,46,47,48,49,50,51,52,53,54,55,56,57,58,59,60,61,62,63,64,65,66,67,68,69,70,71,72,73,74,75,76,77,78,79,80,81,82,83,84,85,86,87,88,89,90,91,92,93,94,95,96,97,98,99,100,101,102,103}, --wan-port {0,1,2,3,4,5,6,7,8,9,10,11,12,13,14,15,16,17,18,19,20,21,22,23,24,25,26,27,28,29,30,31,32,33,34,35,36,37,38,39,40,41,42,43,44,45,46,47,48,49,50,51,52,53,54,55,56,57,58,59,60,61,62,63,64,65,66,67,68,69,70,71,72,73,74,75,76,77,78,79,80,81,82,83,84,85,86,87,88,89,90,91,92,93,94,95,96,97,98,99,100,101,102,103}
WAN port number
-v VLAN, --vlan VLAN VLAN id
-s STATIC, --static STATIC
Static IPv4/mask for WAN link
-s6 STATIC6, --static6 STATIC6
Static IPv6/mask for WAN link
-g GATEWAY, --gateway GATEWAY
Default gateway IP address
-g6 GATEWAY6, --gateway6 GATEWAY6
Default gateway IP address
-d, --dhcp Use DHCP for WAN link
-d6, --dhcp6 Use DHCPv6 for WAN link
-a, --slaac Use SLAAC for IPv6 WAN link
-gt GLOBAL_TENANT_ID, --global-tenant-id GLOBAL_TENANT_ID
Global Tenant id
-lk LOCAL_PSK, --local-psk LOCAL_PSK
IPSec Key (default=1234)
-rk REMOTE_PSK, --remote-psk REMOTE_PSK
IPSec Key (default=1234)
-p, --pppoe Use PPPoE interface for staging
-pu PPPOE_USER, --pppoe_user PPPOE_USER
PPPoE username,mandatory for PPPoE
-pp PPPOE_PASSWORD, --pppoe-password PPPOE_PASSWORD
PPPoE password,mandatory for PPPoE
-ps PPPOE_SERVICE, --pppoe-service PPPOE_SERVICE
PPPoE service name
-pa PPPOE_ACCESS_CONCENTRATOR, --pppoe-access-concentrator PPPOE_ACCESS_CONCENTRATOR
PPPoE access_concentrator
-wu WWAN_USER, --wwan_user WWAN_USER
wwan username
-wp WWAN_PASSWORD, --wwan-password WWAN_PASSWORD
wwan password
-wapn WWAN_APN, --wwan-apn WWAN_APN
wwan apn name
-wpin WWAN_PIN, --wwan-pin WWAN_PIN
wwan simpin
3. Run the staging.py script with required parameters, explicitly specify the parameters that are not default values
[admin@Branch-2: ~] $ sudo /opt/versa/scripts/staging.py -l SDWAN-Branch@Lab_20.com -r Controller-1-staging@Lab_20.com -w 0 -s 192.168.3.101/24 -g 192.168.3.1 -n SR102 -c 172.16.3.2
[sudo] password for admin:
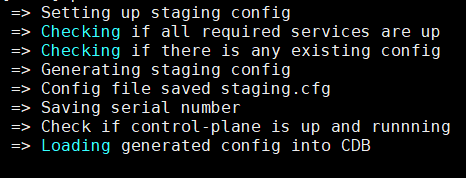
=> Setting up staging config
=> Checking if all required services are up
=> Checking if there is any existing config
=> Generating staging config
=> Config file saved staging.cfg
=> Saving serial number
=> Check if control-plane is up and runnning
=> Loading generated config into CDB
Note: If the appliance is being onboarded into a Provider org, but the tenant ID for Provider is not 1, then specify the tenant id using the parameter -gt GLOBAL_TENANT_ID in the script. If this is not provided, even if the IPSEC towards Controller comes UP, the Director will not receive a task and onboarding will fail.
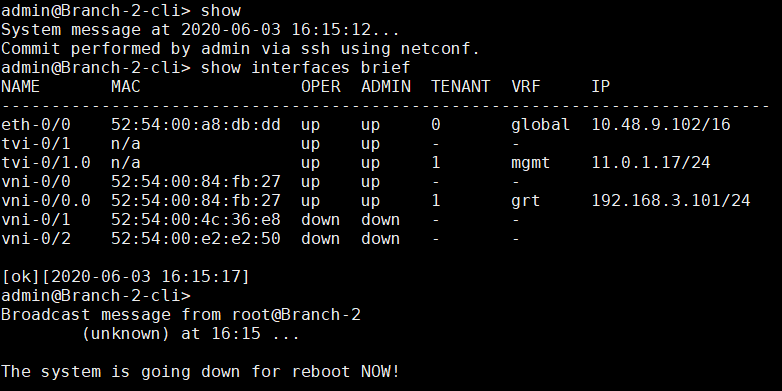
After reboot, the device should have the correct config.
admin@Branch-2-cli> show interfaces brief
NAME MAC OPER ADMIN TENANT VRF IP
---------------------------------------------------------------------------------------------
eth-0/0 52:54:00:a8:db:dd up up 0 global 10.48.9.102/16
ptvi10 n/a up up 4 Ceres-Control-VR 11.2.192.2/32
ptvi11 n/a up up 4 Ceres-Control-VR 11.2.192.1/32
ptvi12 n/a up up 5 Dracaen-Control-VR 11.3.64.2/32
ptvi13 n/a up up 5 Dracaen-Control-VR 11.3.64.1/32
ptvi4 n/a up up 6 Lab_20-Control-VR 11.1.64.2/32
ptvi5 n/a up up 6 Lab_20-Control-VR 11.1.64.1/32
ptvi6 n/a up up 2 Astroid-Control-VR 11.1.192.2/32
ptvi7 n/a up up 2 Astroid-Control-VR 11.1.192.1/32
ptvi8 n/a up up 3 Bluecap-Control-VR 11.2.64.2/32
ptvi9 n/a up up 3 Bluecap-Control-VR 11.2.64.1/32
tvi-0/10 n/a up up - -
tvi-0/10.0 n/a up up 4 Ceres-Control-VR 11.2.128.102/32
tvi-0/11 n/a up up - -
tvi-0/11.0 n/a up up 4 Ceres-Control-VR 11.2.192.102/32
tvi-0/12 n/a up up - -
tvi-0/12.0 n/a up up 5 Dracaen-Control-VR 11.3.0.102/32
tvi-0/13 n/a up up - -
tvi-0/13.0 n/a up up 5 Dracaen-Control-VR 11.3.64.102/32
tvi-0/4 n/a up up - -
tvi-0/4.0 n/a up up 6 Lab_20-Control-VR 11.1.0.102/32
tvi-0/5 n/a up up - -
tvi-0/5.0 n/a up up 6 Lab_20-Control-VR 11.1.64.102/32
tvi-0/6 n/a up up - -
tvi-0/6.0 n/a up up 2 Astroid-Control-VR 11.1.128.102/32
tvi-0/602 n/a up up - -
tvi-0/602.0 n/a up up 6 Internet-Transport-VR 169.254.0.2/31
tvi-0/603 n/a up up - -
tvi-0/603.0 n/a up up 6 Lab_20-LAN-VR 169.254.0.3/31
tvi-0/604 n/a up up - -
tvi-0/604.0 n/a up up 6 Internet-Transport-VR 169.254.0.4/31
tvi-0/605 n/a up up - -
tvi-0/605.0 n/a up up 2 Astroid-LAN-VR 169.254.0.5/31
tvi-0/606 n/a up up - -
tvi-0/606.0 n/a up up 6 Internet-Transport-VR 169.254.0.6/31
tvi-0/607 n/a up up - -
tvi-0/607.0 n/a up up 3 Bluecap-LAN-VR 169.254.0.7/31
tvi-0/608 n/a up up - -
tvi-0/608.0 n/a up up 6 Internet-Transport-VR 169.254.0.8/31
tvi-0/609 n/a up up - -
tvi-0/609.0 n/a up up 4 Ceres-LAN-VR 169.254.0.9/31
tvi-0/610 n/a up up - -
tvi-0/610.0 n/a up up 6 Internet-Transport-VR 169.254.0.10/31
tvi-0/611 n/a up up - -
tvi-0/611.0 n/a up up 5 Dracaen-LAN-VR 169.254.0.11/31
tvi-0/7 n/a up up - -
tvi-0/7.0 n/a up up 2 Astroid-Control-VR 11.1.192.102/32
tvi-0/8 n/a up up - -
tvi-0/8.0 n/a up up 3 Bluecap-Control-VR 11.2.0.102/32
tvi-0/9 n/a up up - -
tvi-0/9.0 n/a up up 3 Bluecap-Control-VR 11.2.64.102/32
vni-0/0 52:54:00:84:fb:27 up up - -
vni-0/0.0 52:54:00:84:fb:27 up up 6 Internet-Transport-VR 192.168.3.101/2
4
vni-0/1 52:54:00:4c:36:e8 up up - -
vni-0/1.0 52:54:00:4c:36:e8 up up 6 MPLS-Transport-VR 192.168.4.101/2
4
vni-0/2 52:54:00:e2:e2:50 up up - -
vni-0/2.104 52:54:00:e2:e2:50 up up 5 Dracaen-LAN-VR 192.168.26.117/
30
vni-0/2.103 52:54:00:e2:e2:50 up up 4 Ceres-LAN-VR 192.168.26.113/
30
vni-0/2.102 52:54:00:e2:e2:50 up up 3 Bluecap-LAN-VR 192.168.26.109/
30
vni-0/2.101 52:54:00:e2:e2:50 up up 2 Astroid-LAN-VR 192.168.26.105/
30
vni-0/2.100 52:54:00:e2:e2:50 up up 6 Lab_20-LAN-VR 192.168.26.101/
30
[ok][2020-06-03 16:18:23]
4. The device should have a tunnel established with the Controllers, over the tvi IPs.

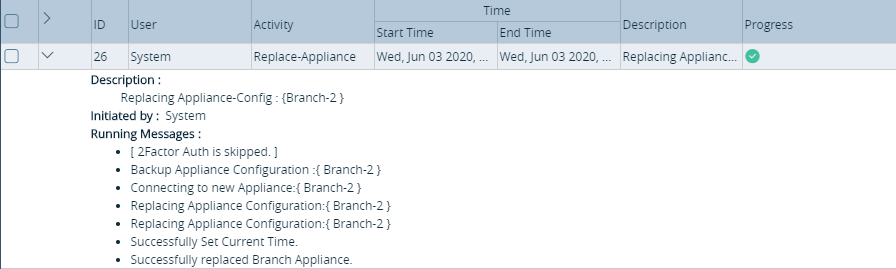
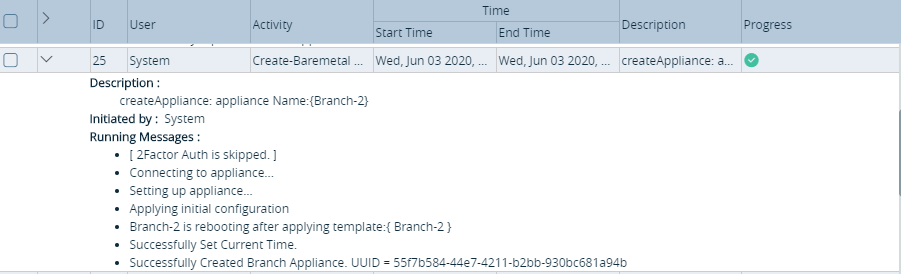
5. The Director will have created a task, which should show the status of branch on-boarding.
Troubleshooting for issues with Staging script.
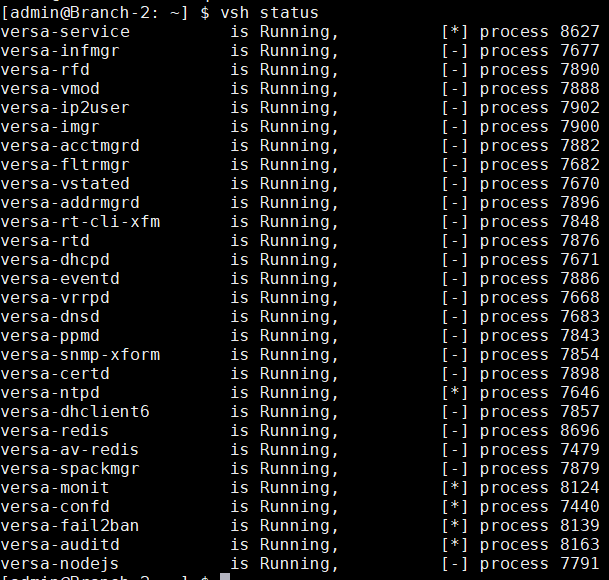
1. Check all the services are running before running the script
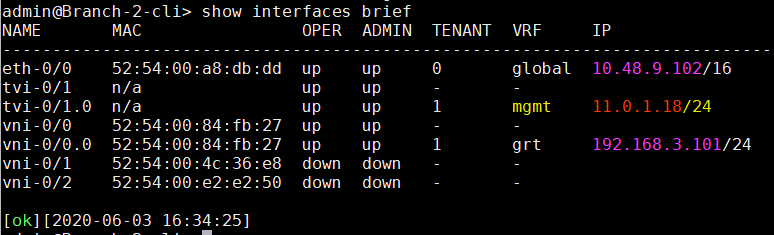
2. Check if the device has received the mgmt IP from the Controller used for staging.
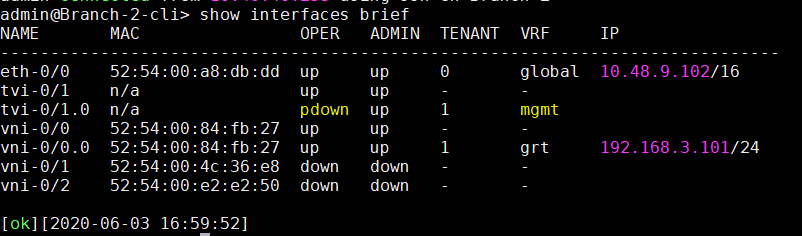
3. If the IP is not assigned please check if the device has a tunnel setup with the Controller on the vni IP.

4. If the tunnel is not formed look for IKE history and check the status.
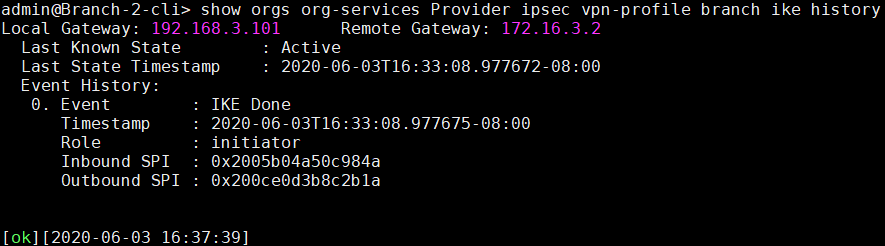
5. Status can be following:
- IKE Done – No action required for the IKE.
- Timed out – Please check the connectivity, ping the remote gateway using the local gateway source and routing instance grt.
- If connectivity doesn’t work go to next step.

- If the ping doesn’t work please check the connectivity with the next-hop.
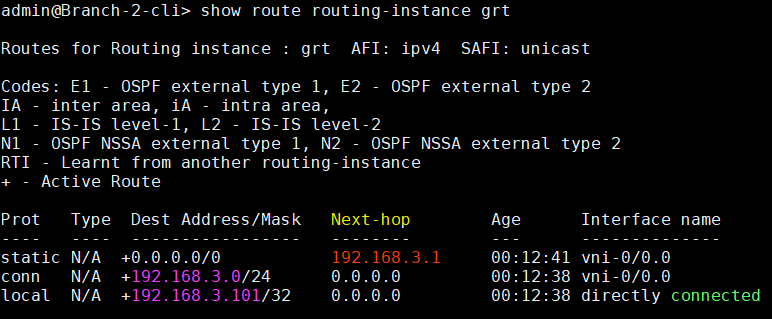

- If the ping to the next-hop doesn’t work, please check the IP configuration of the device and fix the next-hop
- Authentication Failure:
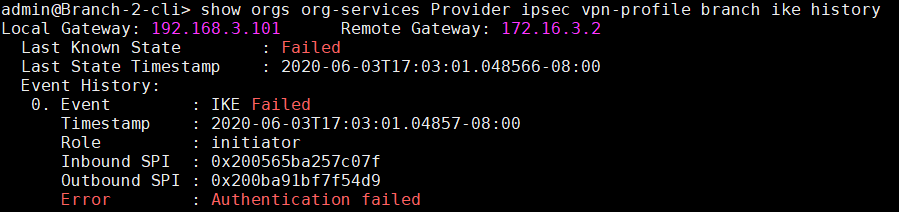
- Please check the string and key for the local and remote fields on the staging script and compare with Controller used for staging.
- Local values for Branch should be peer values for Controller, and vice versa.
- See below to check the difference in auth.
- Invalid Syntax:
- Please check the transform sets and other parameters, they should be same as controller.
To check the difference in Auth information or Syntax, compare the ‘Provider’ profile on branch, with the name or Provider on the controller for the staging profile used. Use ‘details’ to see default parameters.
Eg. On Branch:
Branch-2-cli(config)% show orgs org-services Provider ipsec vpn-profile branch | details
On Controller:
Controller-2-cli(config)% show orgs org-services Lab_20 ipsec vpn-profile Internet-Controller-2-StagingIpsec | details
- Here Lab_20 is the name of my Provider-org and Internet-Controller-2-Staging is the staging profile I am using on the Controller, since I am onboarding the branch on Internet circuit.
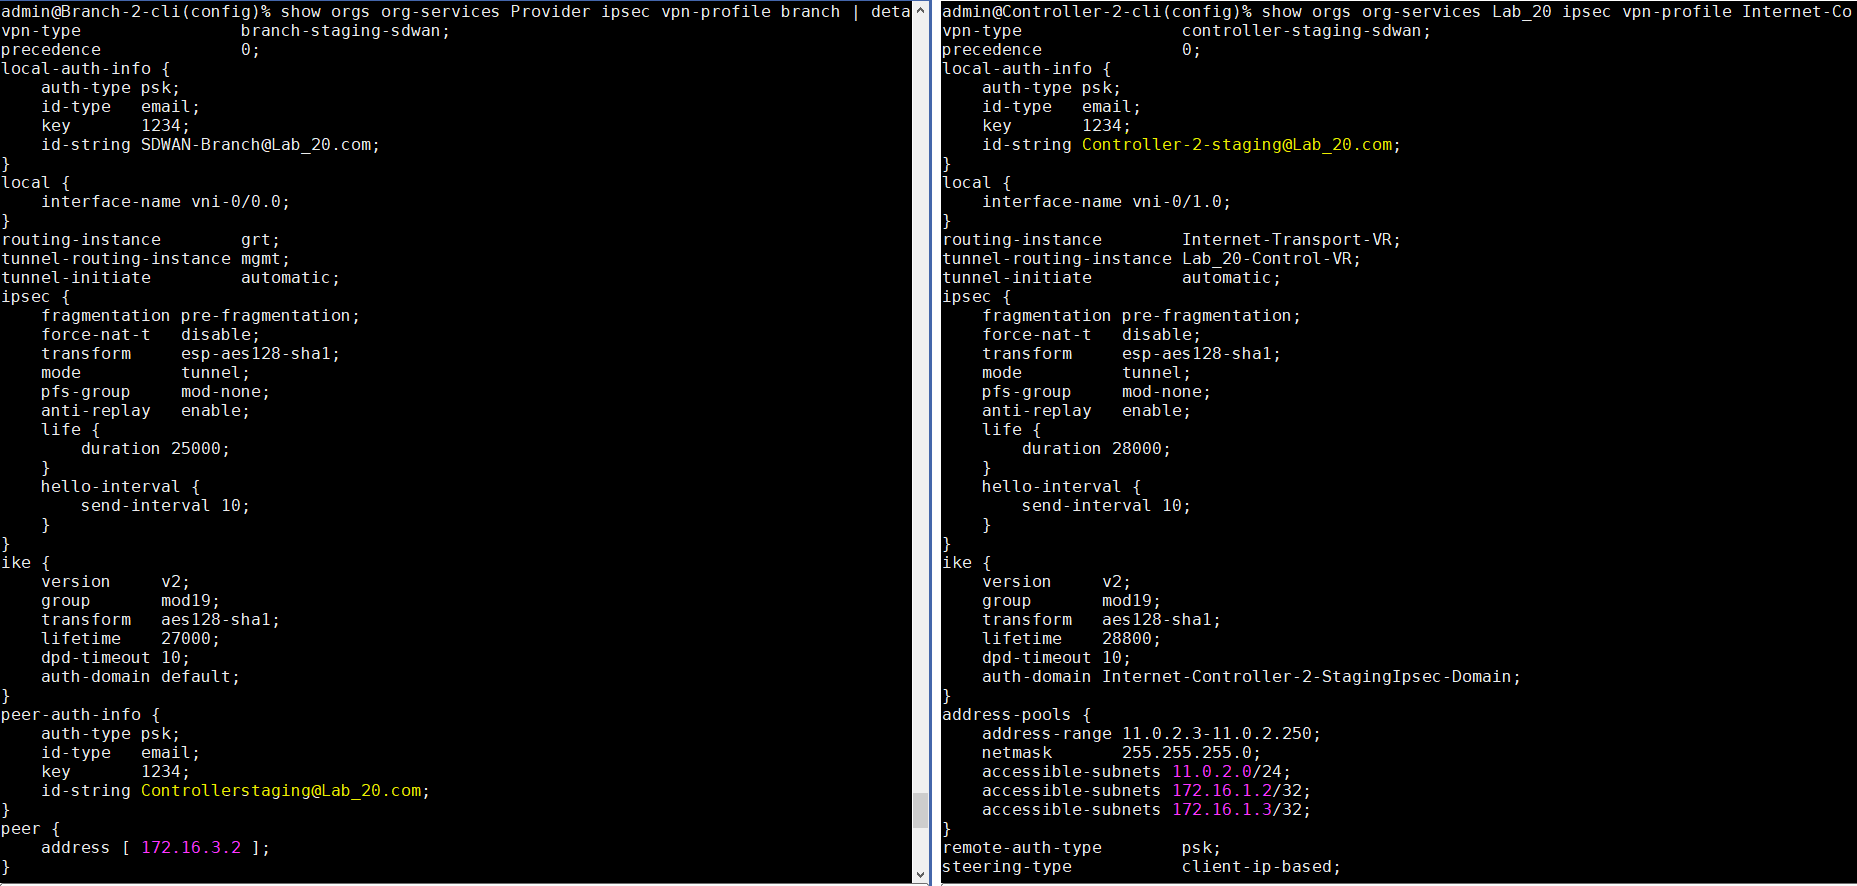
- Notice the mismatch in peer-auth-info id-string on Branch and the local-auth-info id-string on Controller.
Remote-ID Mismatch:
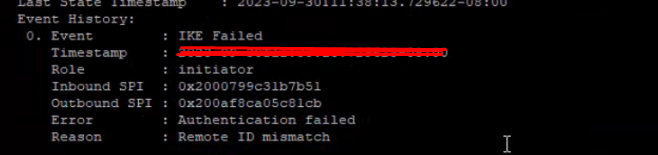
it If you see this error, Please check the Remote_ID of the script and compare with the controller staging VPN profile.
6. If the device got the mgmt IP from the Controller please wait for some time to allow it to reboot and load the new config by itslef. Check the Director task for new device onboarding.
7. If the branch doesn’t receive the config from the Director and doesn’t reboot after getting the mgmt IP, please check the following.
- Has the Controller sent a branch-connect notification to the Director after the branch has formed the tunnel with the controller and received the mgmt IP, check for the alarm on the Controller. If the controller doesn't send the branch-connect, the Director will not have a task for onboarding.

- If the Controller hasn’t sent the alarm to the Director, check the parameters on the staging script on the device.
- Check if the Controller used for staging has the Director south-bound IP in the VNF manager config.

8. If the Director created the task to on-board the Branch but has failed, look for the error on the task.
Common errors:
- Connection to the appliance failed.
- - Check the connectivity from the Director to the Branch, and vice-versa. The Branch should still be having the mgmt IP if the post-staging template hasn’t been pushed from the Director.
- - If the ping fails, use count and packet-size on the ping command and capture tcpdump on the path from the Director to the Controller to the Branch, or forward and reverse path of the pings to isolate connection issue.

- For other errors on the task, related to the post-staging template, device bind-data, please check the corresponding fields on the template and the device.
* URL Based ZTP
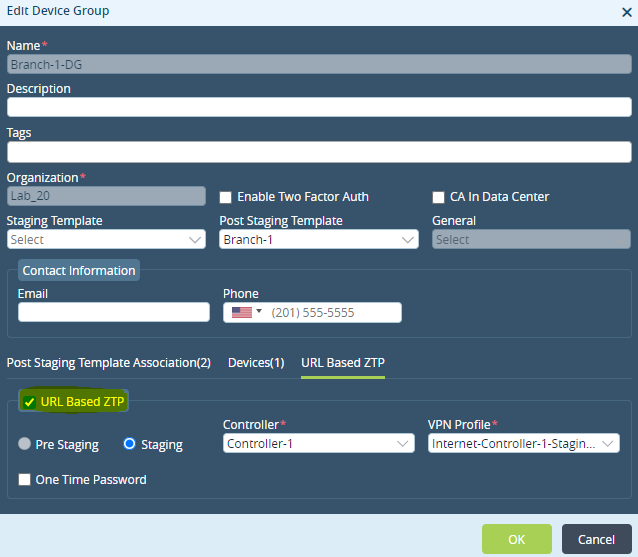
- To use URL based ZTP, this option needs to be chosen on the device group for the device to be on-boarded.
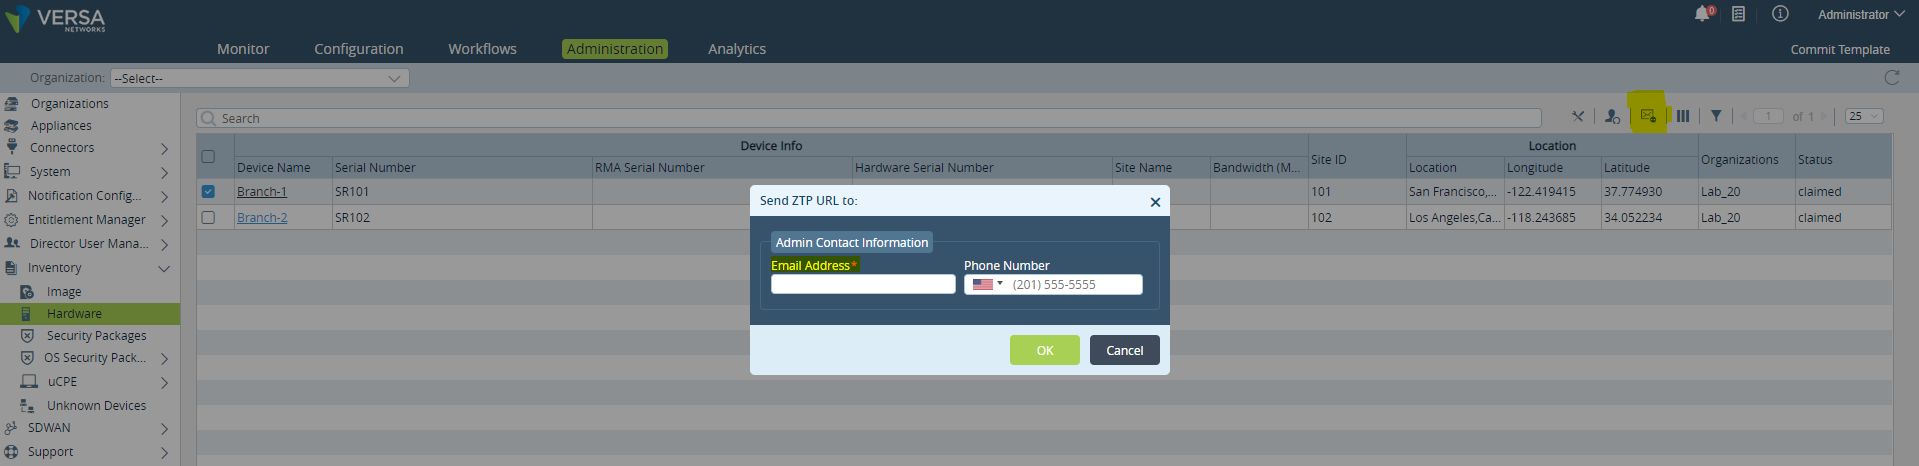
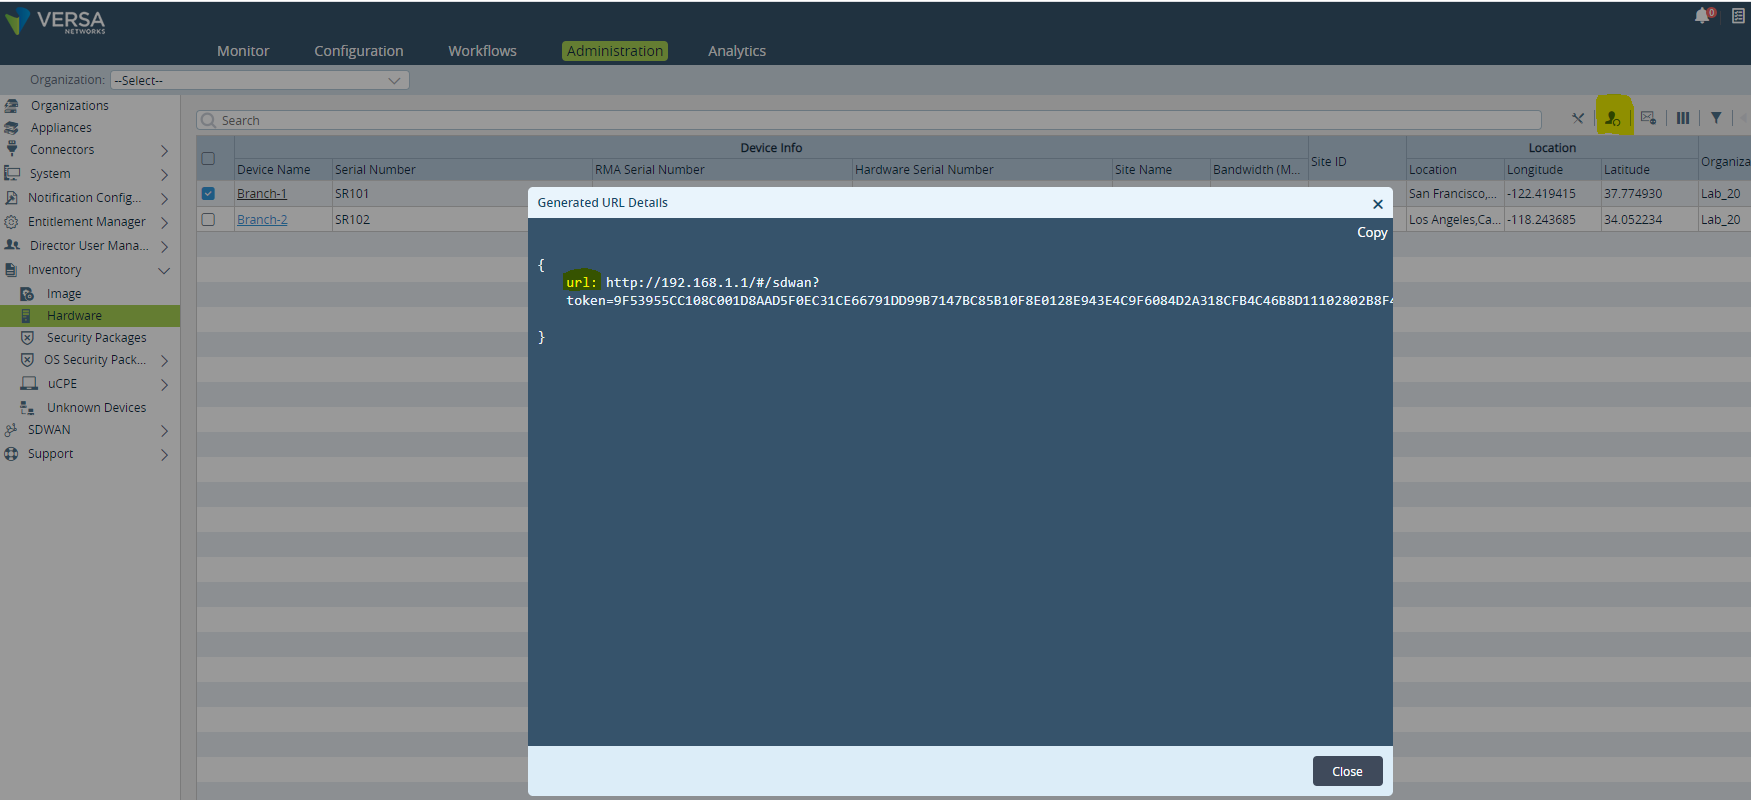
2. For a device using URL based ZTP, trigger an email or copy the URL to onboard the device.
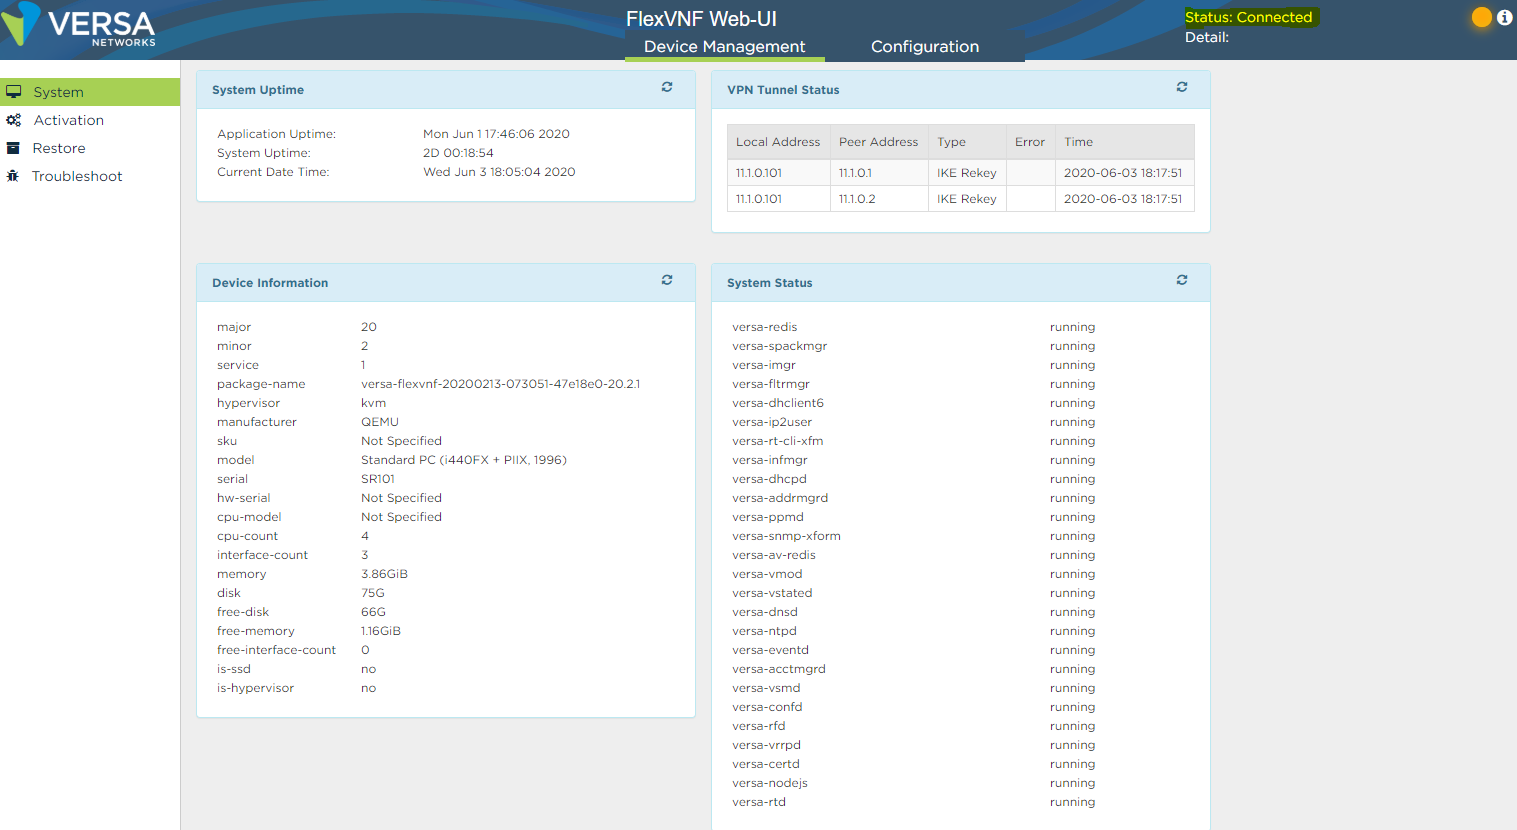
3. A successful completion of URL ZTP should show ‘Status:Connected’
- Troubleshooting issues with URL based ZTP:
1. The staging isn’t initiated, load-merge the default config on the Branch appliance.

2. Load the default config:

3. If the default config is loaded, you can ‘Start Activation’
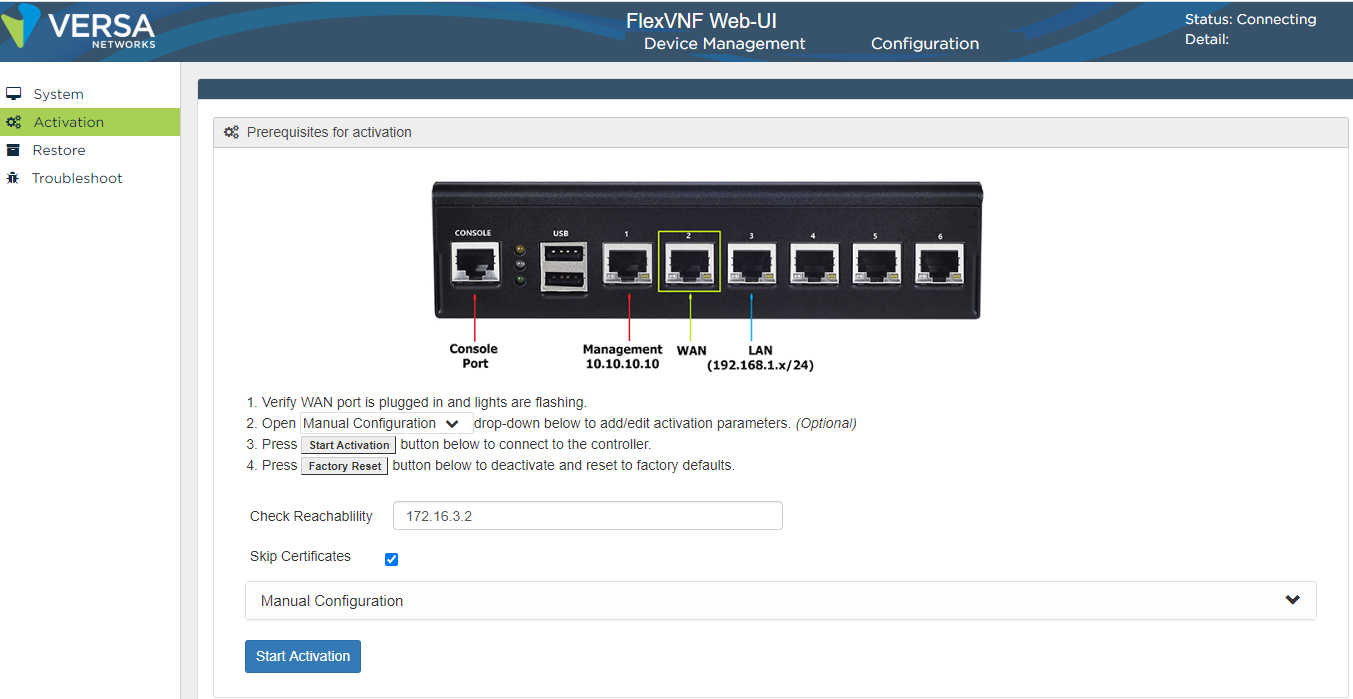
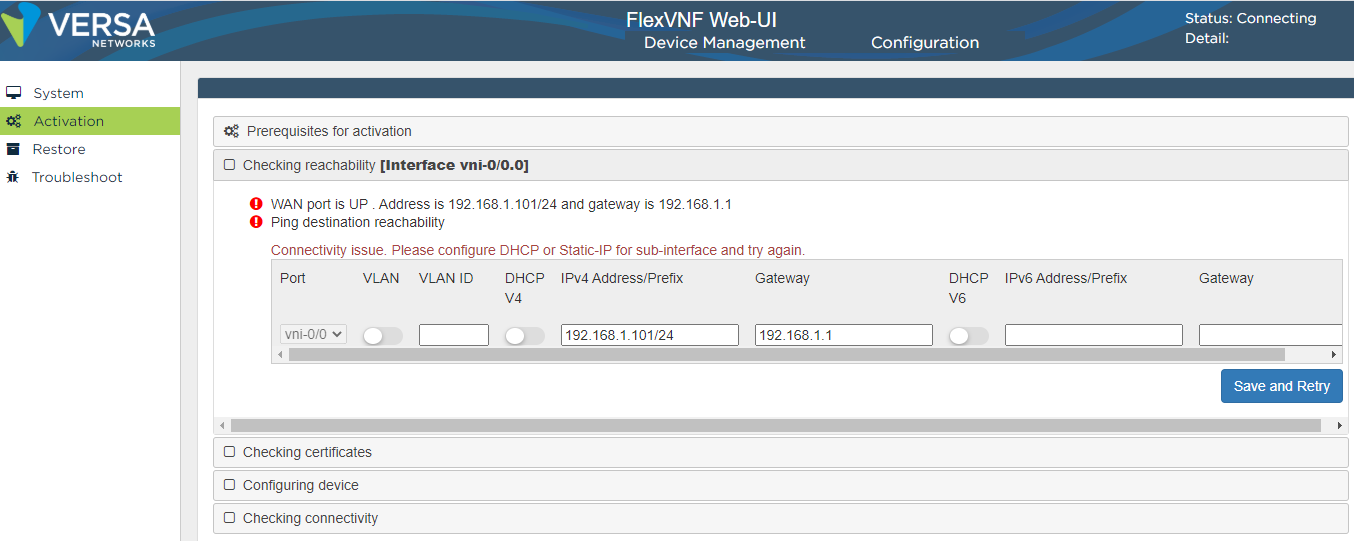
4. If the connection is broken between the device and the controller, the staging will fail with connectivity errors.
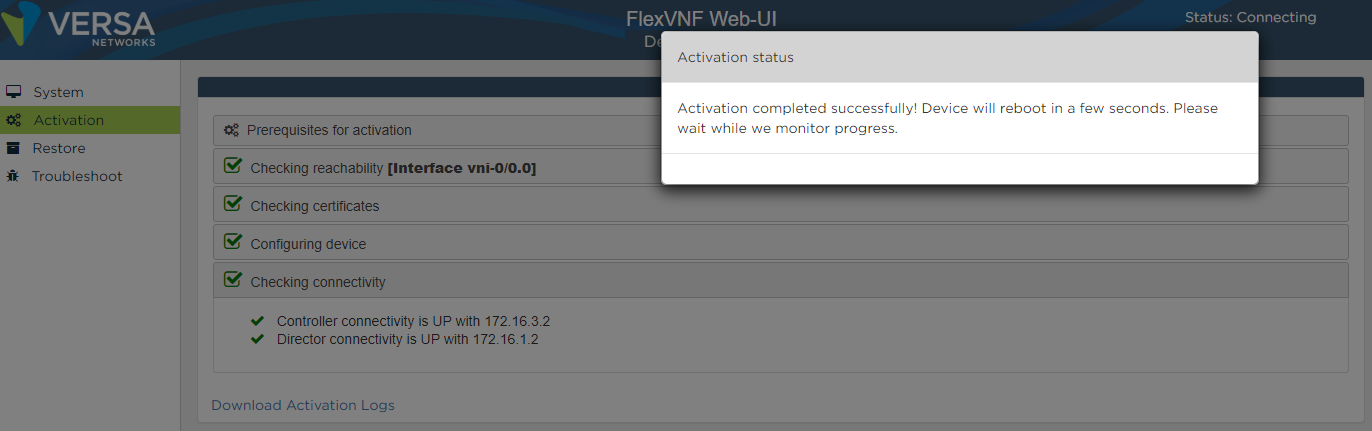
5. Once the activation completes successfully, the status will show successful and the branch will reboot and load the post staging configuration.
*GZTP
1. How to onboard a device using GZTP