Creating LDAP Server Profile
Follow these steps to create an LDAP server profile:
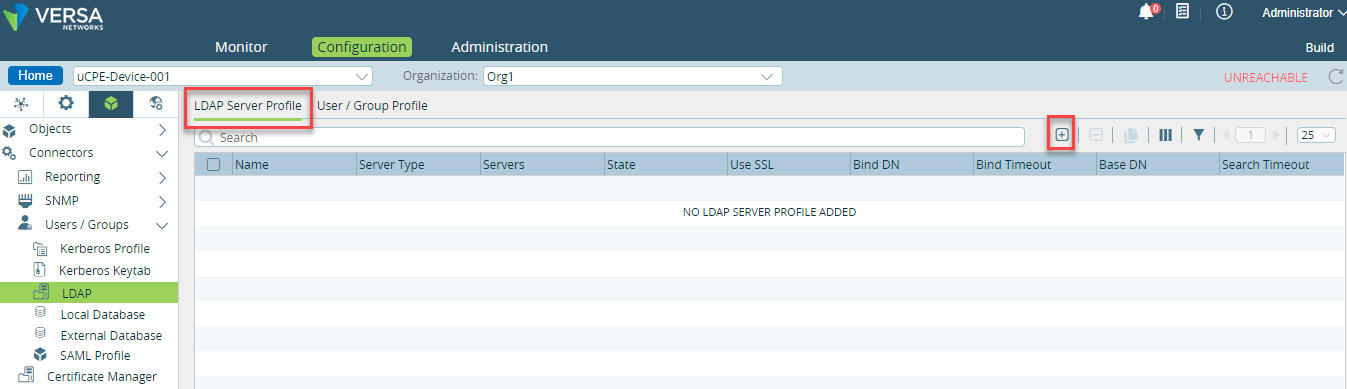
- In Versa Director, select an appliance > Configuration > Objects & Connectors > Connectors > Users/Groups > LDAP > LDAP Server Profile and click
 .
.
This opens Add LDAP Server Profile window.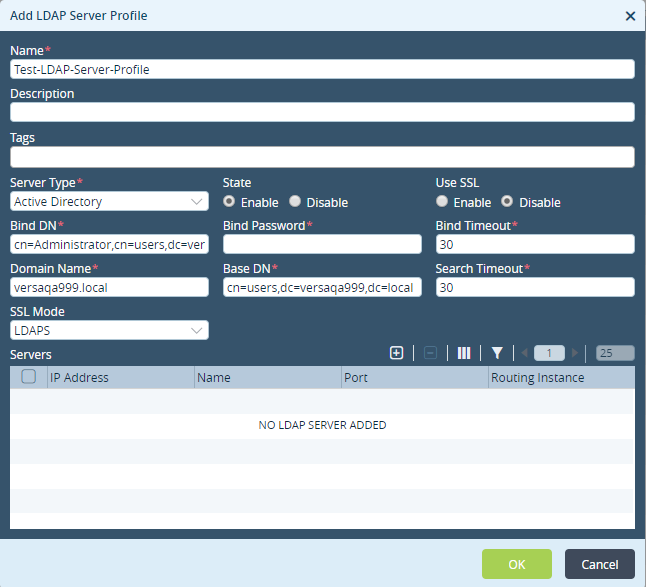
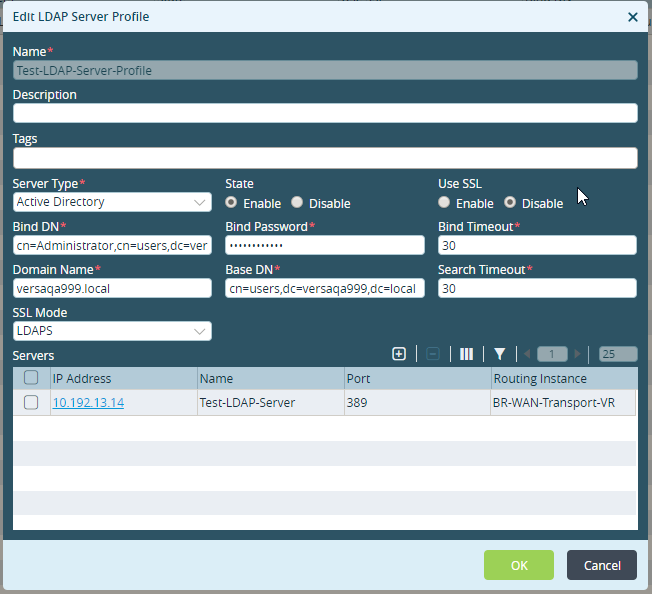
Enter these details.Field Description Name Name of the LDAP server. Server Type Select Active Directory as the server type. This allows the Versa NGFW to populate the LDAP attributes in the group mapping settings. State State of the LDAP server profile: Enable Disable Use SSL Enable or disable the usage of SSL on the group mapping information. Bind DN Administrator provided Bind Distinguished Name (DN) authentication credentials for binding to the LDAP tree. Bind Password Administrator provided Bind password. Bind Timeout Bind timeout period in seconds. Domain Name Administrator provided MS Windows domain name (for Active Directory). Base DN Base DN of the LDAP tree location for the Versa NGFW initiate a search for user and group information. Search Timeout Search timeout period in seconds. - Click
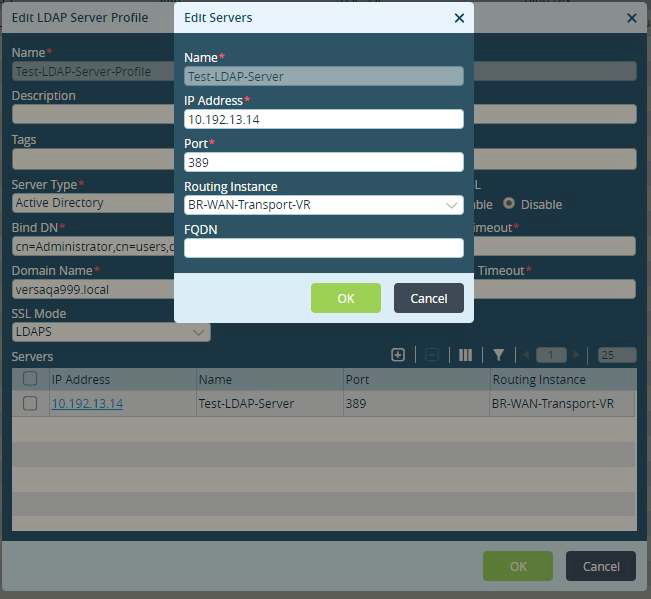
 on Add LDAP Server Profile window to Add servers.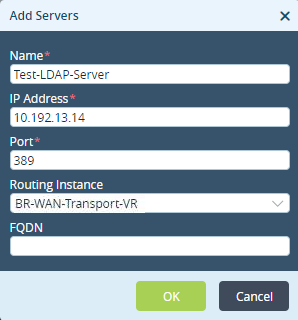
Enter these details and click OK.Field Description Name Name of the server. IP Address IP address of the server. Port Port number of the server. Routing Instance Routing instance of the server.
Creating LDAP User/Group Profile
Follow these steps to create an LDAP user/group profile:
In Versa Director, select an appliance > Configuration > Objects & Connectors > Connectors > Users/Groups > LDAP > User/Group Profile and click.
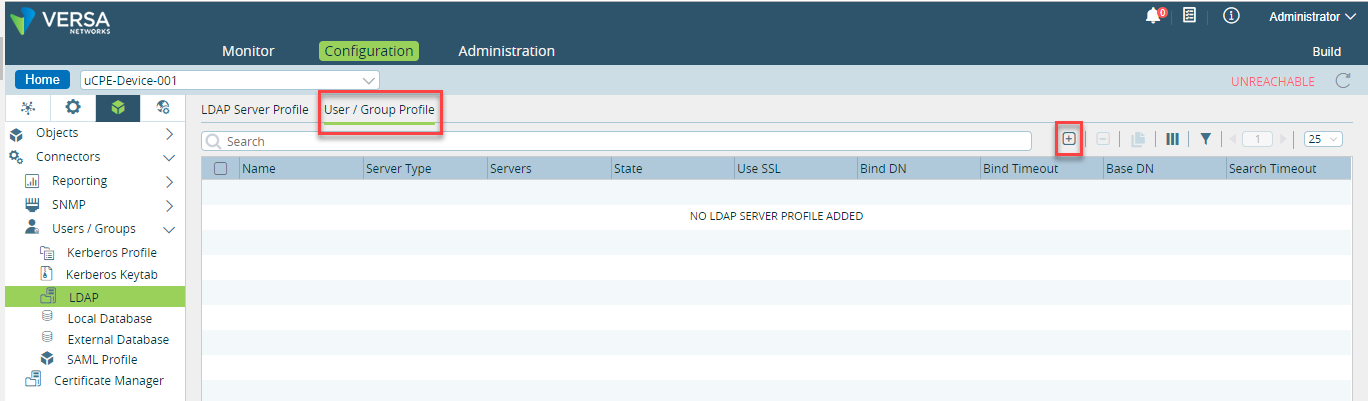
This opens Add User/Group Profile window.
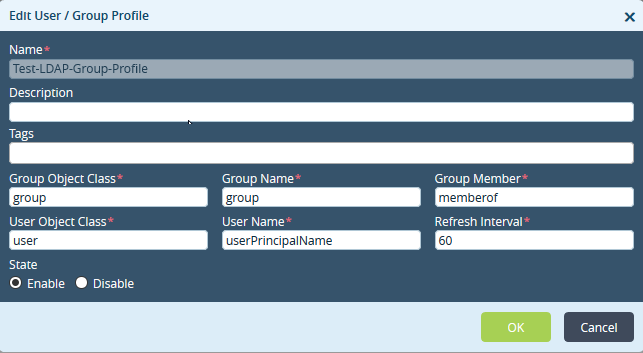
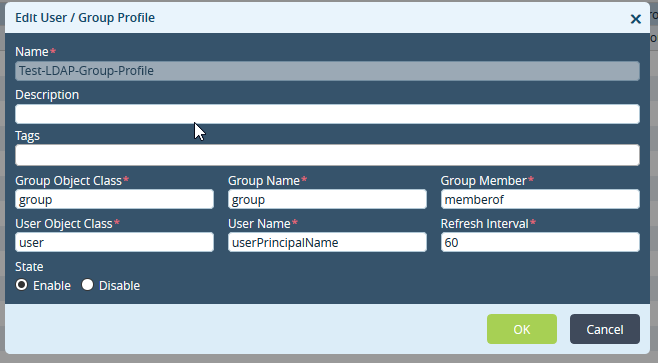
Enter these details and click OK.
Field | Description |
|---|---|
| Name | Profile name. |
| Group Object Class | Administrator provided group object class. |
| Group Name | Administrator provided group name. |
| Group Member | Administrator provided group member. |
| User Object Class | Administrator provided user object class. |
| User Name | Format of the user name. For example, user Principal Name. |
| Refresh Interval | Time period in seconds to refresh the profile details. |
| State | |
| Enable/Disable | Enable or disable the user/group profile. |
Create Profile for LDAP Authentication
Follow these steps to create a profile for LDAP authentication:
- In the Versa Director, select an appliance > Configuration > Services > Next Gen Firewall > Authentication > Profiles and click
 .
.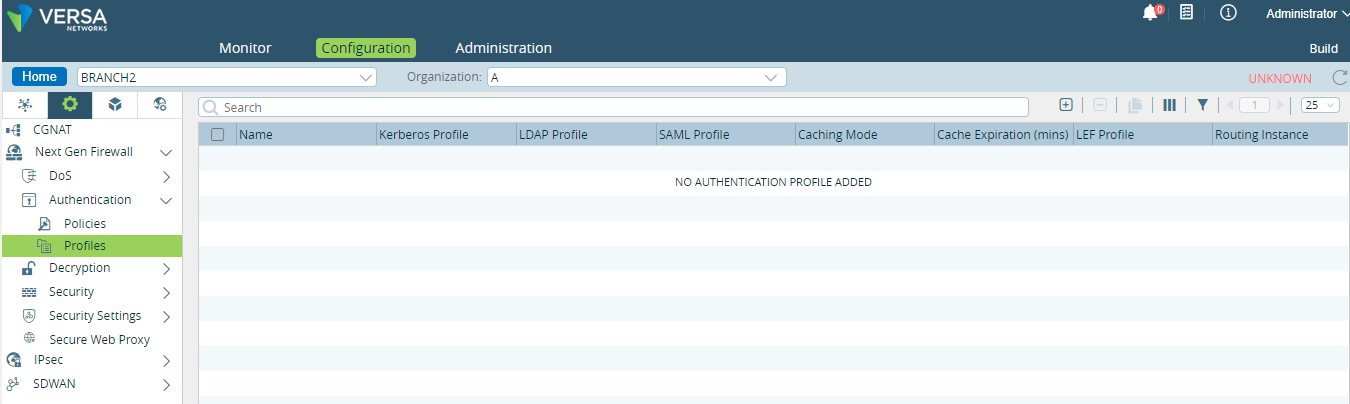
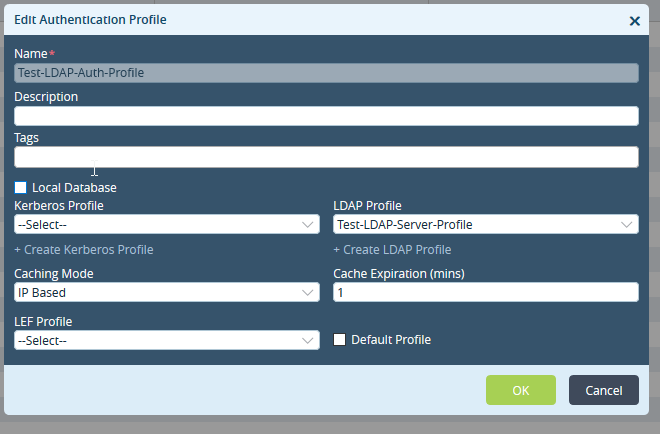
- This opens Add Authentication Profile window.
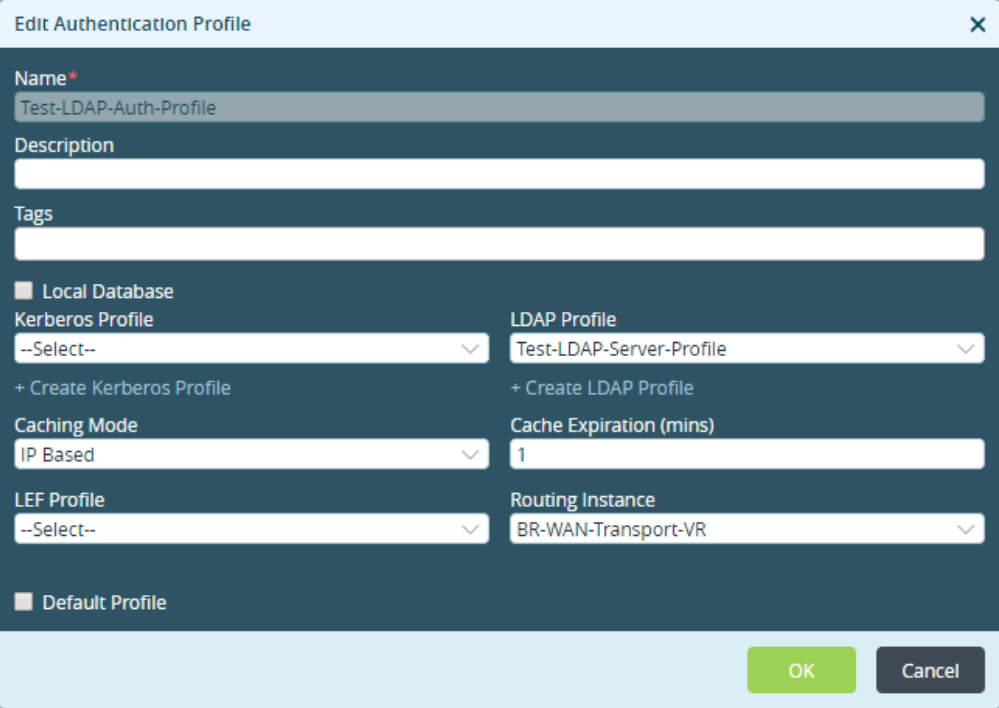
Enter these details and click OK.
Creating a Rule for the LDAP Authentication
Follow these steps to create a rule for LDAP authentication:
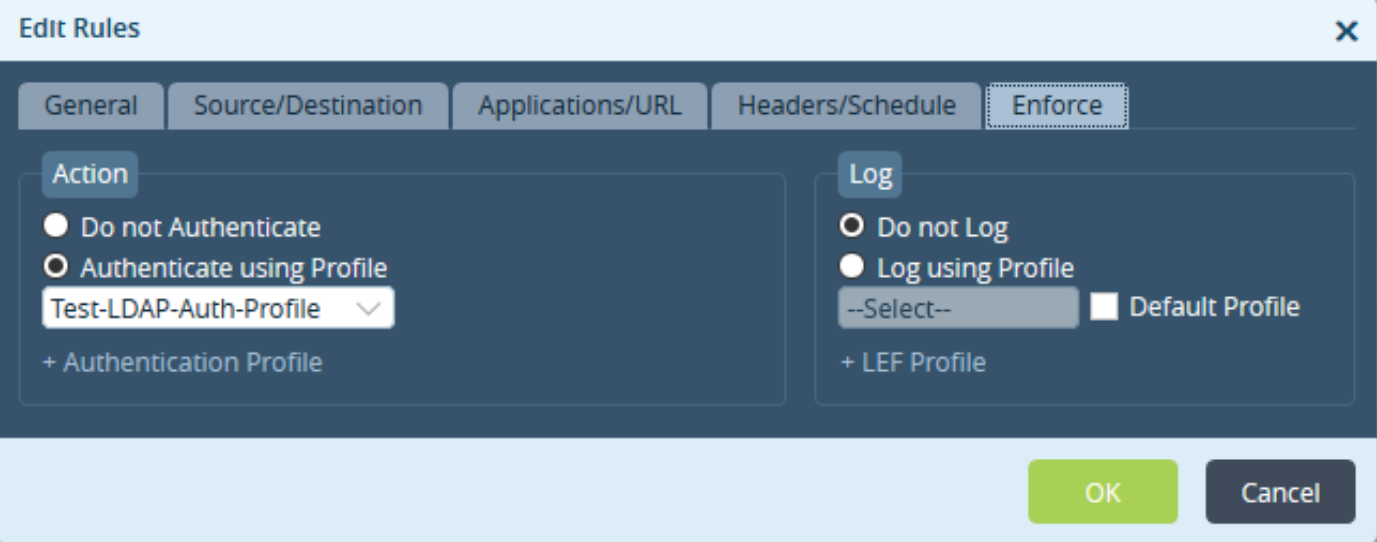
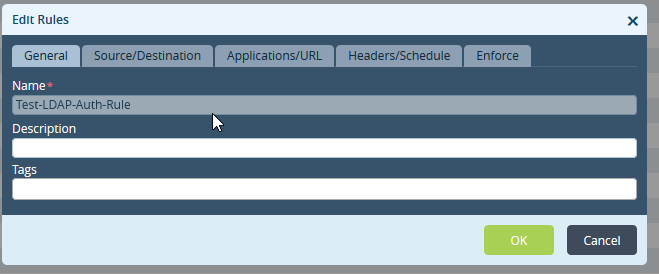
In the Versa Director, select an appliance > Configuration > Services > Next Gen Firewall > Authentication > Policies > Rules and click. This opens Edit Rules window.
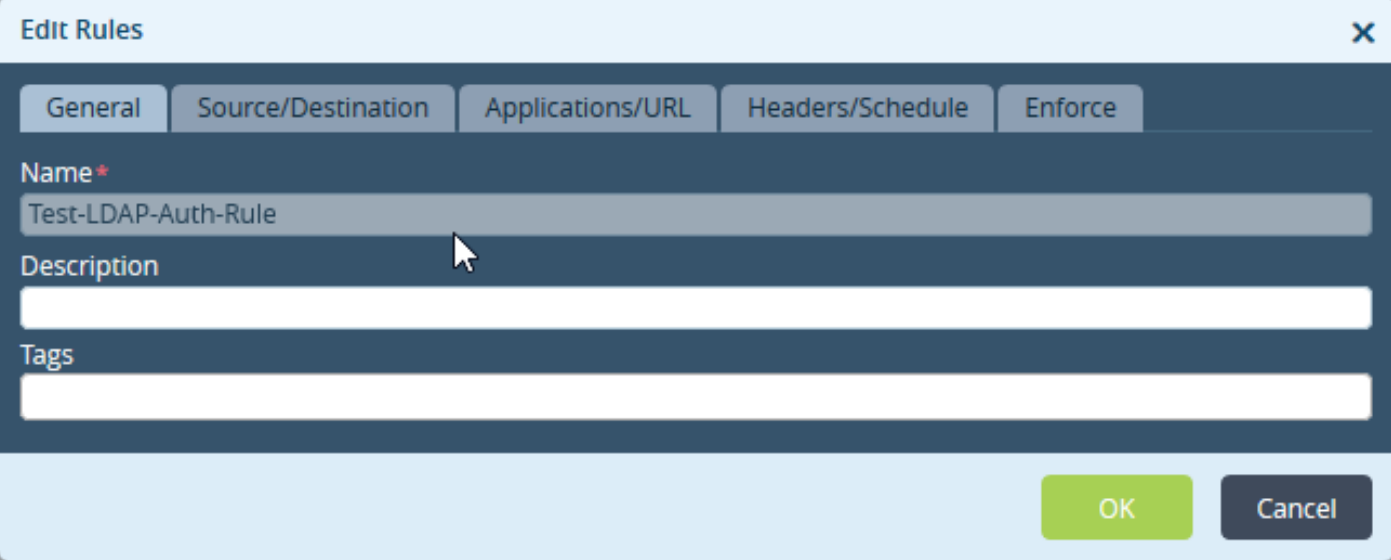
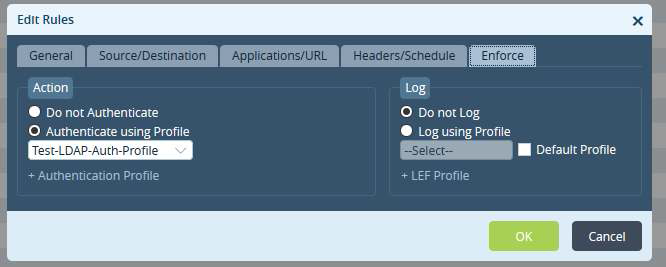
Click Enforce tab on Edit Rules window and provide the details and click OK.
Creating a Private Key for a Certificate
Follow these steps to create a private key for a certificate:
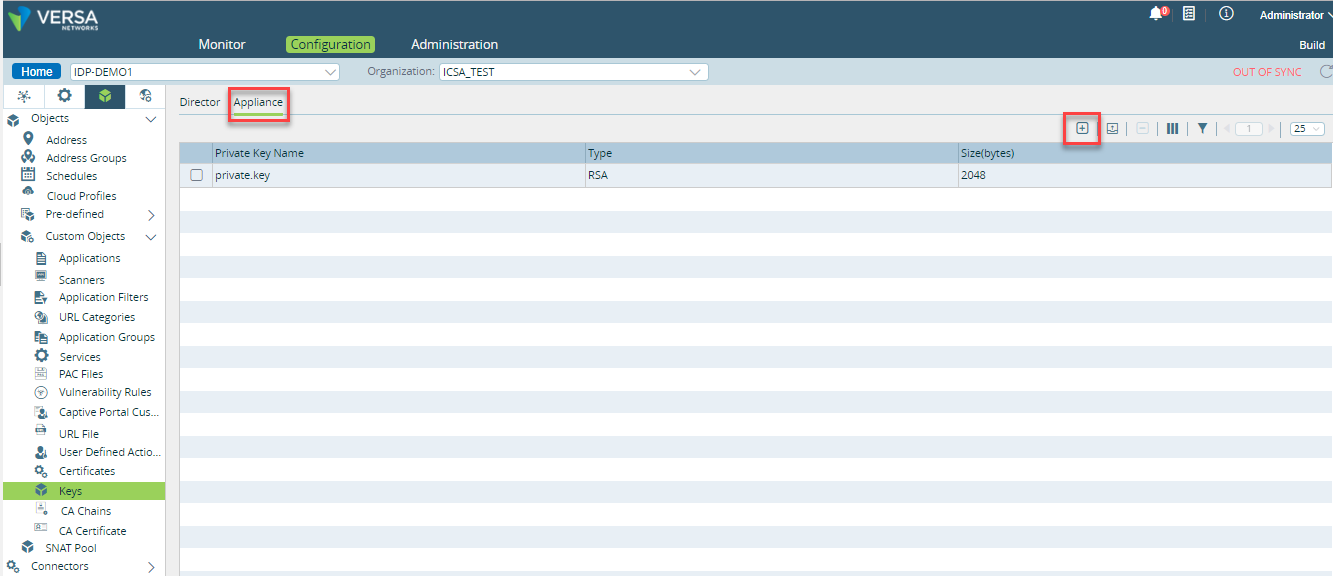
In the Versa Director, select an appliance > Configuration > Objects & Connectors > Custom Objects > Keys > Appliance and click.
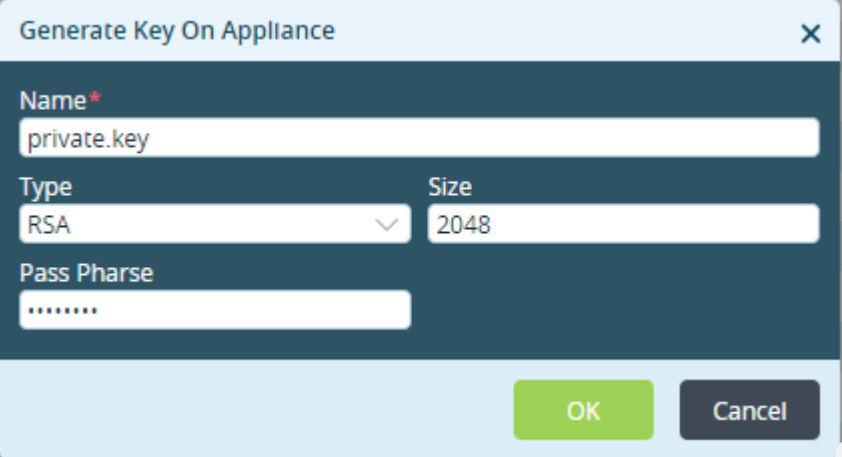
This opens Generate Key On Appliance window.
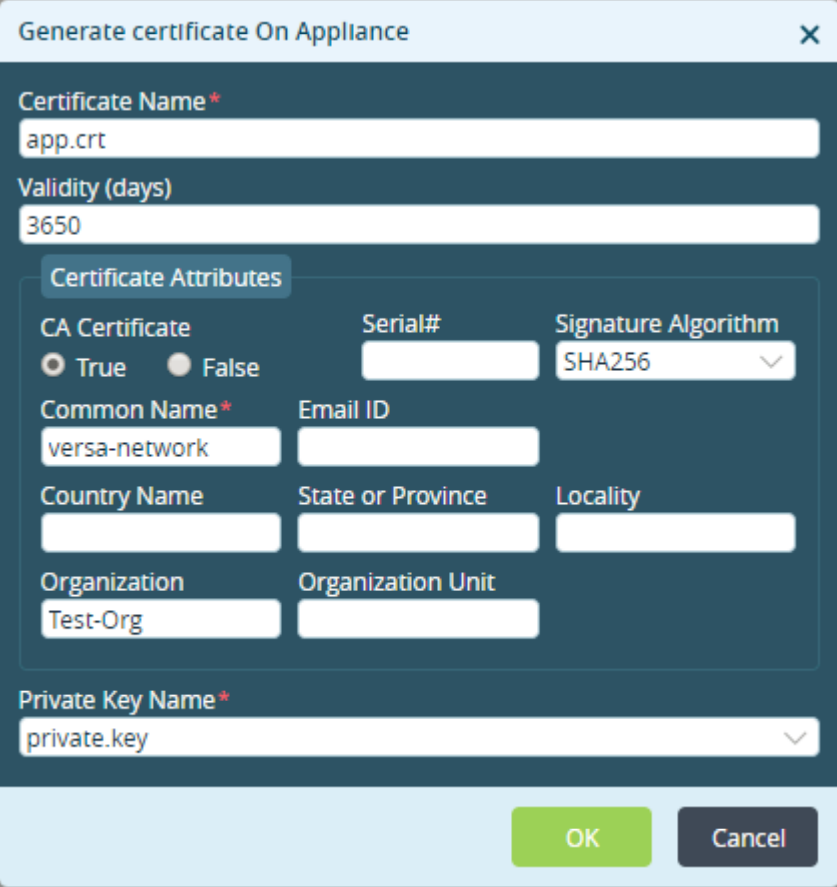
Creating a Certificate
Follow these steps to create a certificate:
In the Versa Director, select an appliance > Configuration > Objects & Connectors > Custom Objects > Certificates> Appliance and click.
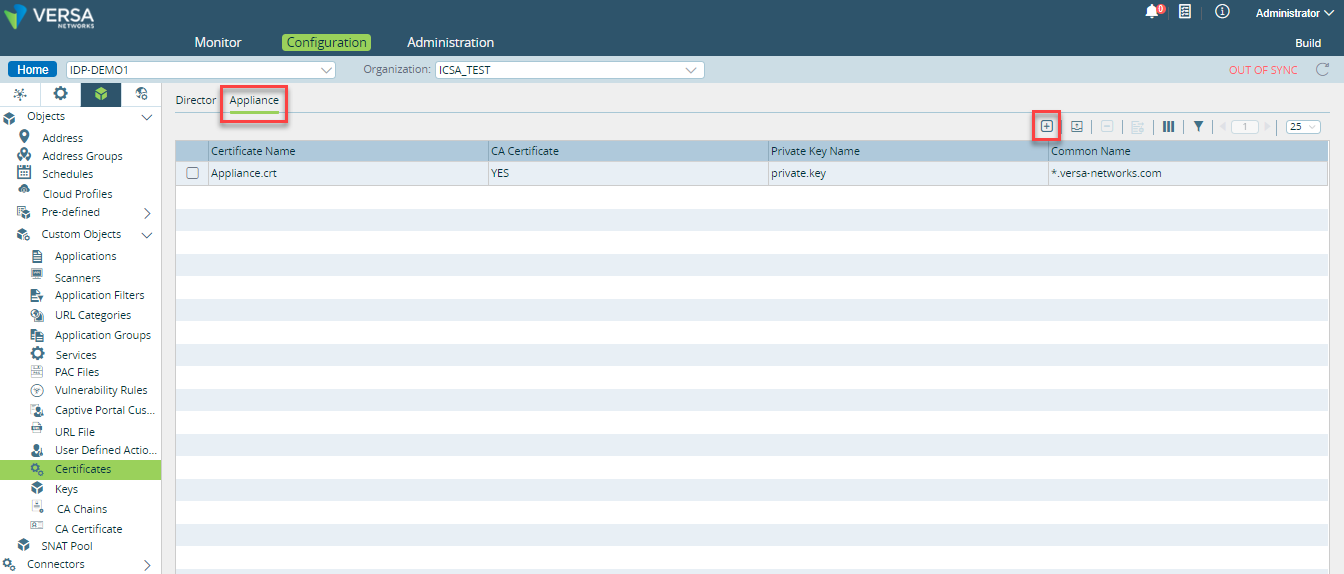
This opens Generate Certificate On Appliance window.
Creating a Decryption Profile
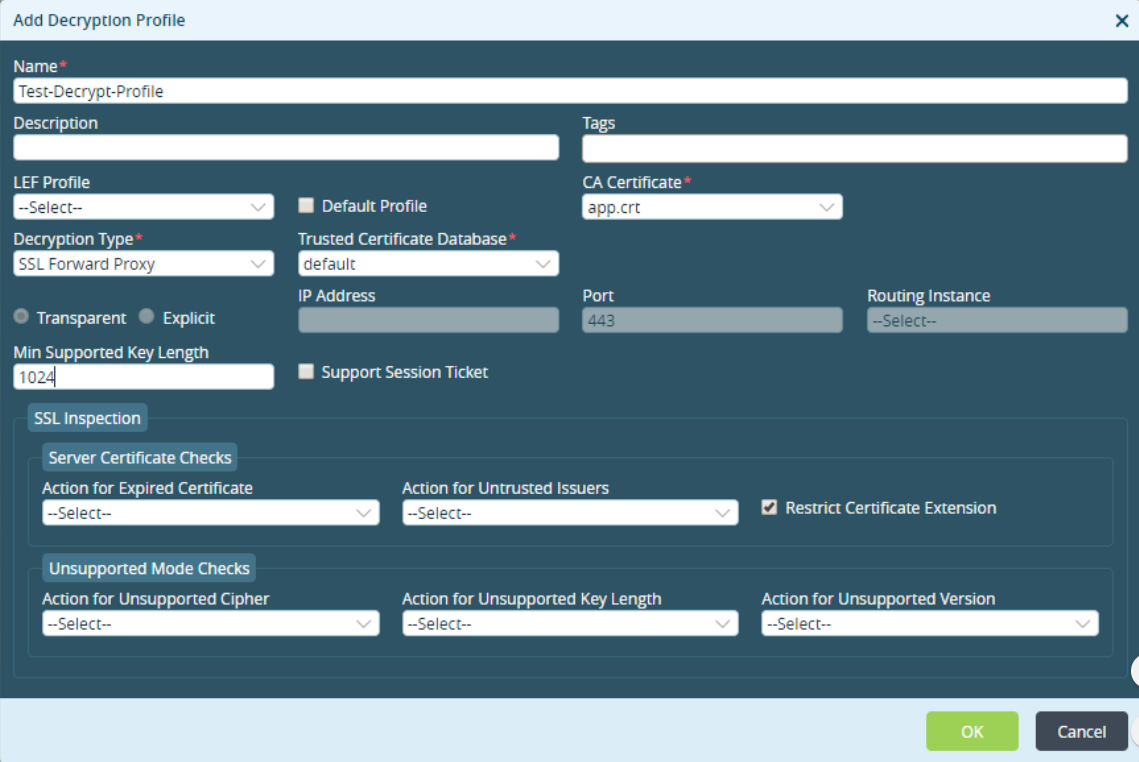
Follow these steps to create a decryption profile:
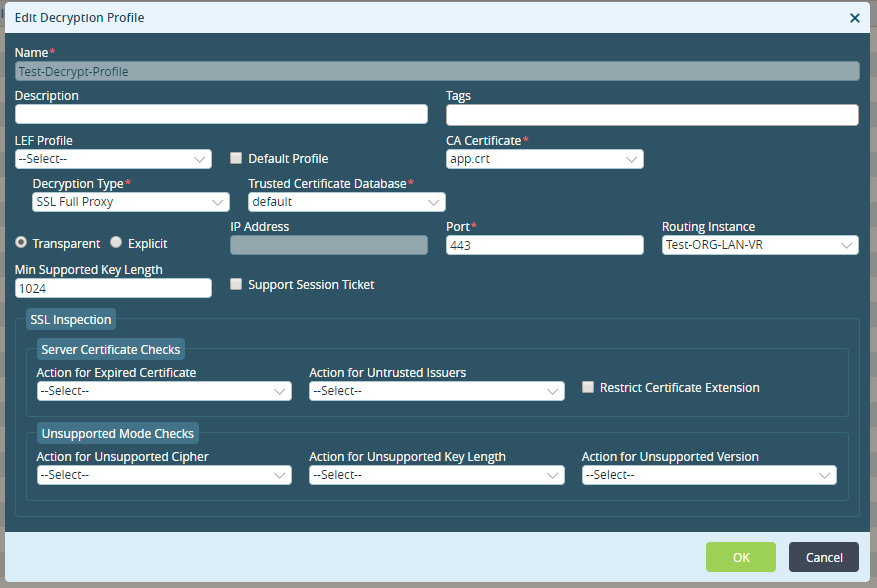
In the Versa Director, select an appliance > Configuration > Services > Next Gen Firewall > Decryption > Profiles and click.
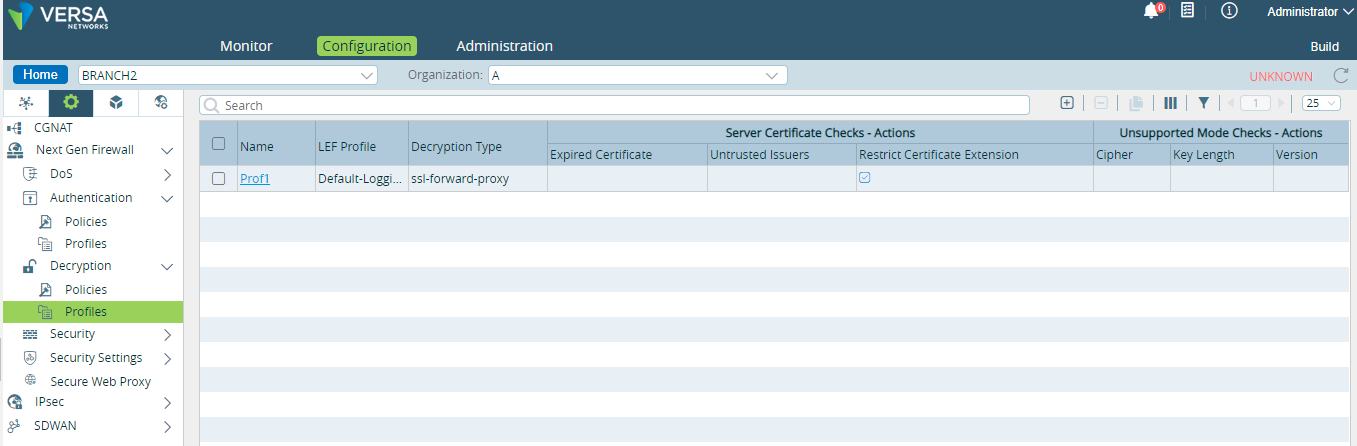
This opens Add Decryption Profile window.
Creating A Decryption Policy Rule
Follow these steps to create a decryption policy rule:
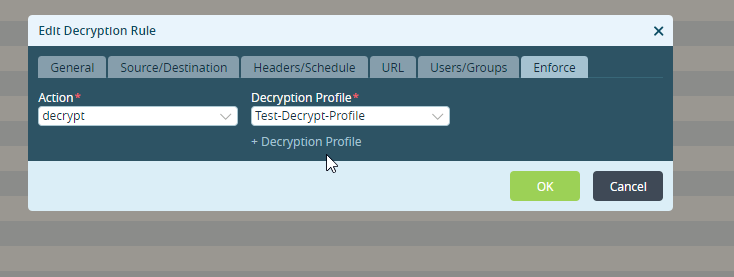
In the Versa Director, select an appliance > Configuration > Services > Next Gen Firewall > Decryption > Policies > Rules and click.
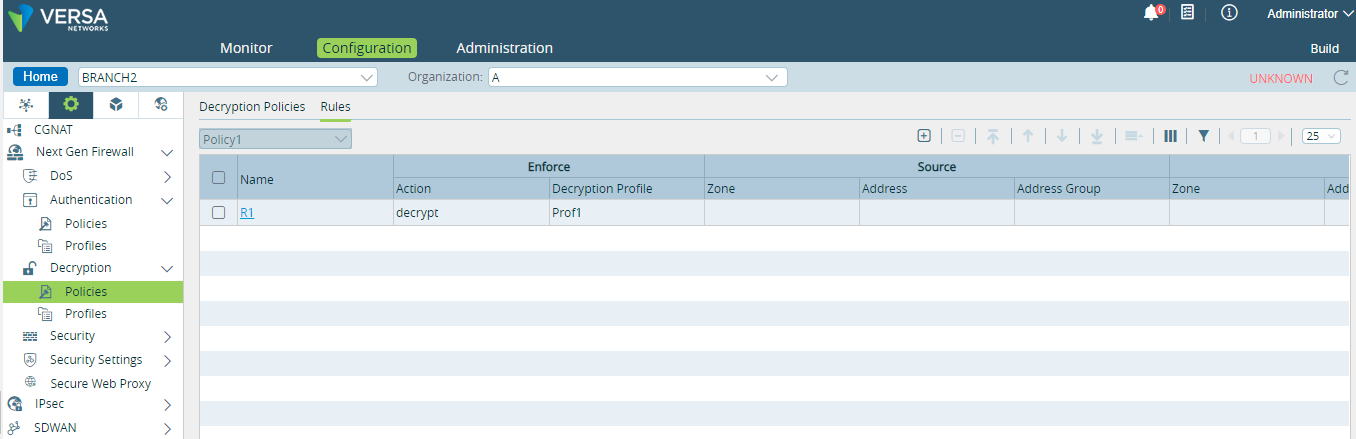
This opens Add Decryption Rule window.
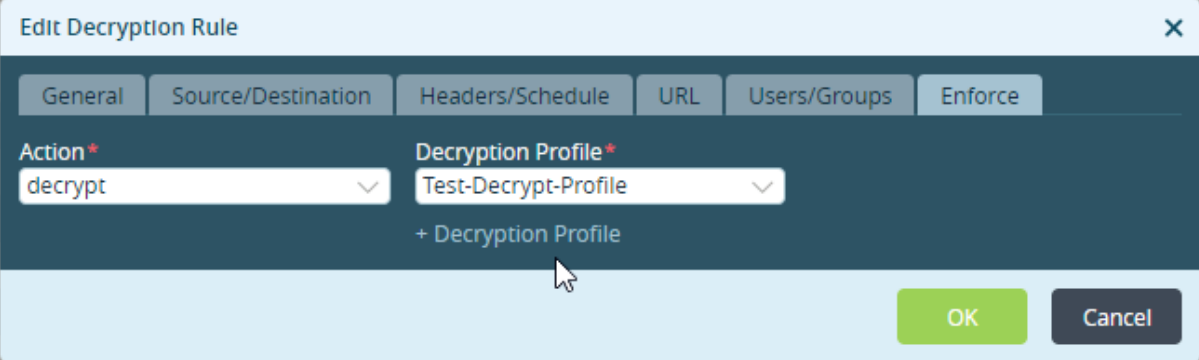
Configuring Captive Portal
Follow these steps to configure the captive portal:
In the Versa Director, select an appliance > Configuration > Services > Next Gen Firewall > Security Settings > Captive Portal and click to Edit Captive Portal Settings.
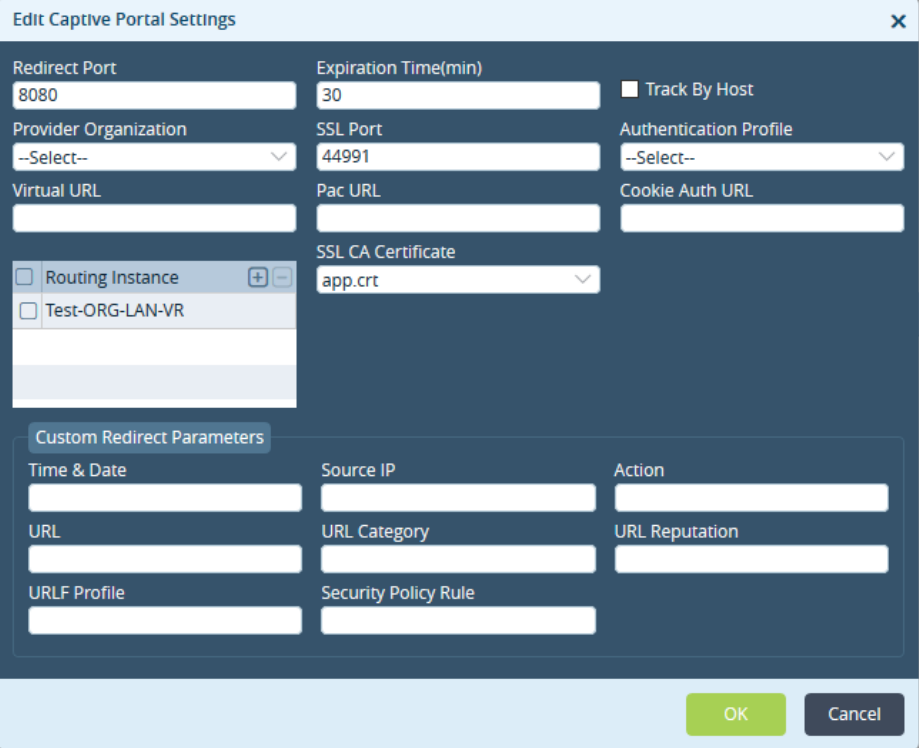
Login LDAP User from Client Browser
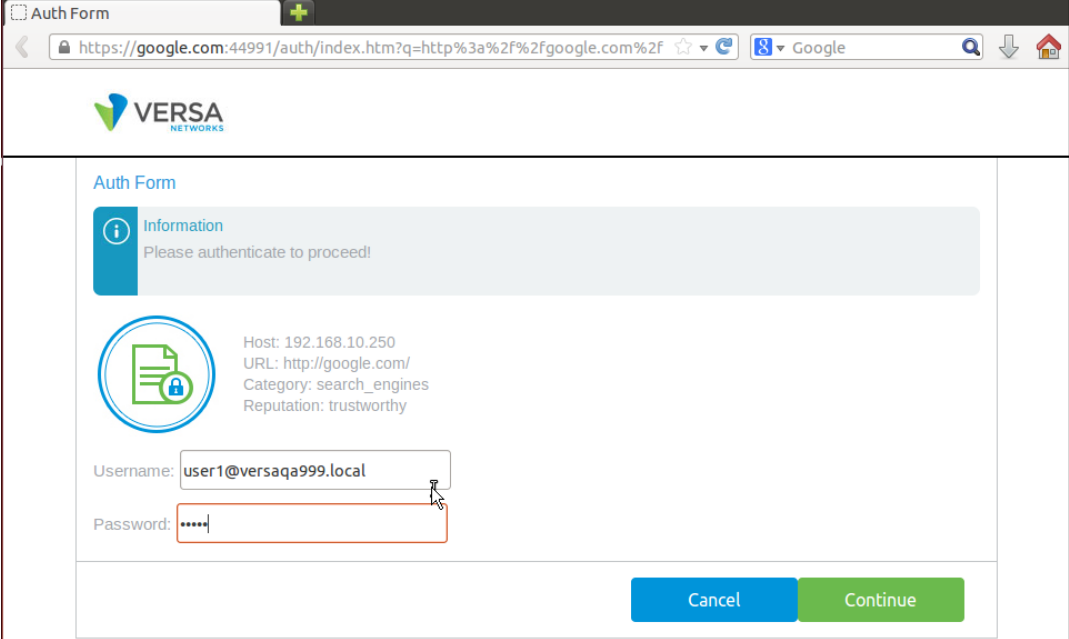
Run the vsh connect vsmd shell command to.........
[admin@BR1: ~] # vsh connect vsmd
Trying ::1...
Trying 127.0.0.1...
Connected to localhost.
Escape character is '^]'.
__ _______ _____ _ _
\ \ / / ____|/ ____| \ | |
\ \ / / | | (___ | \| |
\ \/ /| | \___ \| . ` |
\ / | |____ ____) | |\ |
\/ \_____|_____/|_| \_|
Run the show identity live-users command to.........
vsm-vcsn0> show identity live-users
User : user1@versaqa999.local
IP : 192.168.10.250
Tenant Id : 2
UID : 2
Group Count : 0
Groups : none
Hit Count : 26
Inactive Since : 1 sec
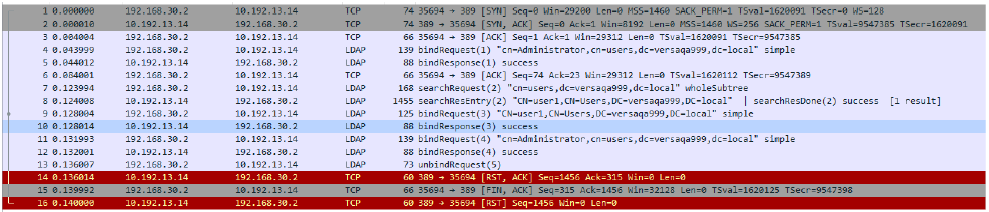
PCAP for LDAP Authentication
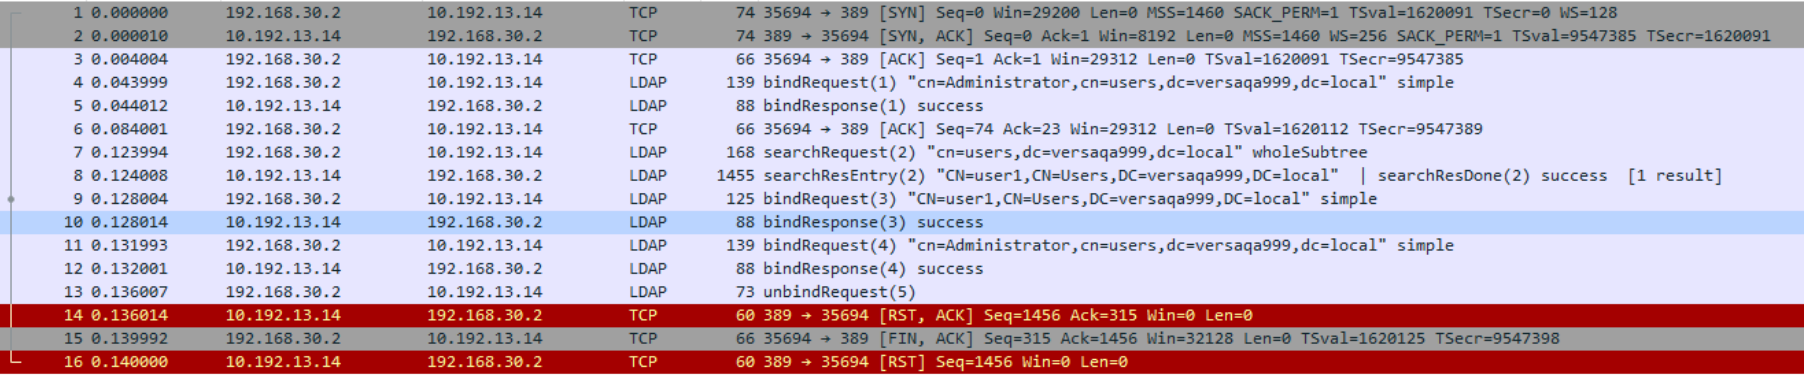
LDAP Authentication
Do Following Configuration for LDAP Authentication:
⇒Create LDAP Server Profile :
⇒Create LDAP User/Group Profile :
⇒Create Authentication Profile for LDAP
⇒Create Authentication Rule for LDAP
⇒Add Routing instance in Authentication Policy from CLI
⇒Configure Captive Portal
⇒Configure Secure Web Proxy (vfp)
=> Create Private Key and certificate
Go to Flexvnf > Configurations > Click on Others icon > System > Keys > Appliance
Go to Flexvnf > Configurations > Click on Others icon > System > Certificates >Appliance
=> Apply certificate in Captive Portal configuration
Go to Flexvnf > Configurations > Click on Services icon > Next Gen Firewall > Security Settings > Captive Portal
⇒Upload certificate in Browser of client system
=> Create SNAT Pool
Go to Flexvnf > Configurations > Click on Object & Connectors icon > Objects > SNAT Pool
=> Create LDAP Server Profile :
Go to Flexvnf > Configurations > Click on Object & Connectors icon > Connector > Users /Group > LDAP
=> Create LDAP User/Group Profile :
Go to Flexvnf > Configurations > Click on Object & Connectors icon > Connector > Users / Group > LDAP
=> Create Profile for LDAP Authentication
Go to Flexvnf > Configurations > Click on Services icon > Next Gen Firewall >Authentication > Profiles
=> Create Rule for LDAP Authentication
Go to Flexvnf > Configurations > Click on Services icon > Next Gen Firewall >Authentication > Policies > Rules
=> Add Routing instance in Authentication Profile from CLI


=> Create Decryption Profile
Go to Flexvnf > Configurations > Click on Services icon > Next Gen Firewall > Decryption> Profiles
=> Create Decryption Policy Rule
Go to Flexvnf > Configurations > Click on Services icon > Next Gen Firewall > Decryption > Policies > Rules
=> Configure Captive Portal
Go to Flexvnf > Configurations > Click on Services icon > Next Gen Firewall > SecuritySettings > Captive Portal
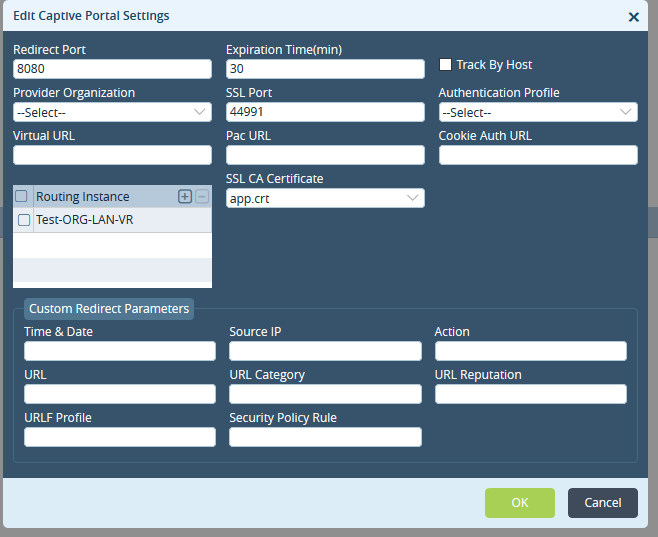
=> Configure Secure Web Proxy (vfp)
Go to Flexvnf > Configurations > Click on Services icon > Next Gen Firewall > Security Settings > Secure Web Proxy
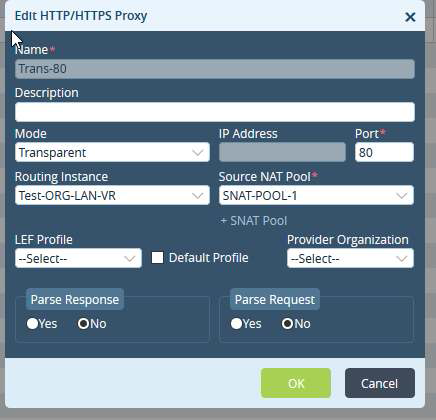
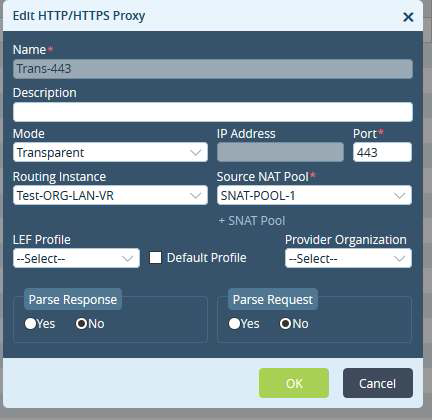
=> PCAP for LDAP authentication
[admin@BR1: ~] # vsh connect vsmd
Trying ::1...
Trying 127.0.0.1...
Connected to localhost.
Escape character is '^]'.
__ _______ _____ _ _
\ \ / / ____|/ ____| \ | |
\ \ / / | | (___ | \| |
\ \/ /| | \___ \| . ` |
\ / | |____ ____) | |\ |
\/ \_____|_____/|_| \_|
vsm-vcsn0> show identity live-users
vsm-vcsn0> show identity live-users
---------------------------------------
User : user1@versaqa999.local
IP : 192.168.10.250
Tenant Id : 2
UID : 2
Group Count : 0
Groups : none
Hit Count : 26
Inactive Since : 1 sec
---------------------------------------
vsm-vcsn0>